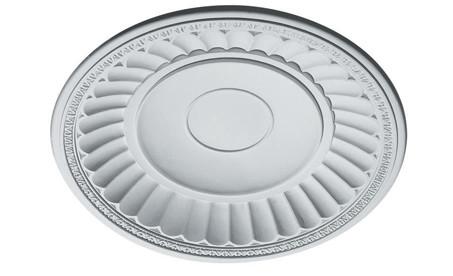


40"Dia X 10-7/8" Deep X 3-1/2" Rim Polyurethane French Ceiling Domes (SKU: CP-DEM-912)
Description
Polyurethane Designers Edge Millwork Mouldings and Millwork encompass a full decorative array of premium quality polyurethane cornice and panel mouldings, medallions, niches, stair brackets, pilasters and other ornamental products that are guaranteed to satisfy all decorative requirements without compromise.
Designers Edge Millwork is impervious to adverse climate and weather conditions, and, because of its dimensional stability, will not alter over time. Produced in exclusive molds that yield ornate and sharply defined details, perfect dimensions, and extremely consistent quality, Designers Edge Millwork is lightweight, impact resistant and easy to install and finish using traditional woodworking techniques and tools.
- Lightweight
- Impact Resistant
- Easy to Install
Measurements
Diameter : 40 "
Depth : 10 7/8"
Rim : 3 1/2"
Installation
Please keep in mind that our Designer's Edge Domes should be used for Decorative purposes only, not to provide structural support.
1. SURFACE - CEILING

2. Glue and Filler Recommended

3. Installation
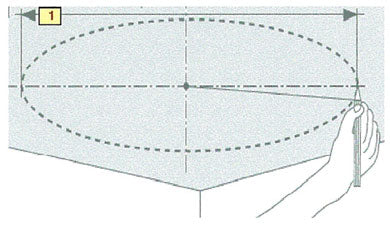
Preparing the Ceiling
Trace the Outline.
Invert Dome and trace Ceiling.
Tip: If you prefer, use the large flattened section of the carboard packaging shipped to make a template.

Cutting the Rough Opening
For Frame and Wallboard Construction:
Cut wallboard and re-move necessary sections of joist. Add as needed for support:


A) framing members,
B) double members on each side and perpendicular to ceiling joist,
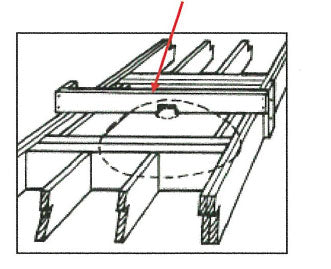
C) Over the top to hold electrical box ( see drawing )

For Suspended Ceiling System
Locate the Center point of the Dome. You can find the center of the dome by using strings.

Once you have found the center point, drill or cut the proper size hold in the dome for any light fixture. When installing into a suspended ceiling system, Use a wood block, into which the suspension wires are secured. Screw from the inside of the dome through wood block that is positioned on the topside of the Dome.


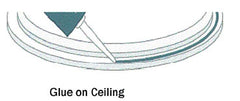
Securing dome.
Frame and Wallboard Construction:
Apply an even bead of polyurethane Multi-purpose (MP-25-ADH) (Adhesive/filler) on the inside of the Dome rim. Raise the Dome into position, and secure into the rough opening framing, driving non-corrosive fasteners(trim screws) up the rim, through the ceiling and into the framing. Slightly countersink fasteners, so that you can cover the heads with adhesive filler for a finished appearance.
If installing a light fixture, you must support the fixture with additional framing that is properly attached to the ceiling or suspended ceiling support system.
Note: Light Fixture is supported by the framing, not by the DOME.


Use non-corrosive screws or Nails.
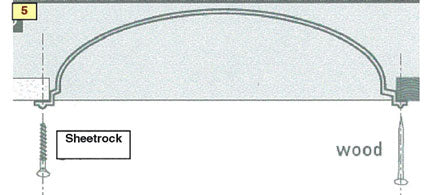
Domes can be secure into Sheetrock of Wood
Drill from the front side.
Insert screws through dome into wallboard or framing.
Fill edges, nail heads and any other minor imperfections with MP-25-ADH (adhesive/filler).
After adhesive of filler has dried, sand any minor surface imperfections. Finish with any quality latex or oil based paint for a beautiful appearance.
DO NOT USE LACQUER PAINTS.

These sizes are approximate, please refrain from cutting the hole until you have actual dome for exact measurement. Please note that actual rough opening depth depends on installation of wood support to hang the ceiling dome.